

For embroidered patches, twill is the material to reach for. For iron-on patches, cotton, denim, and canvas give the most reliable bond. Delicate or heat-sensitive fabrics like nylon, silk, leather, and spandex need a needle and thread instead of a hot iron. If a patch has to survive weekly washing on a jacket or backpack, iron it on first, then stitch the edges for a near-permanent hold.
TL;DR:
- Twill is the preferred fabric for embroidered patches due to its stability and high stitch quality, making it ideal for detailed and commercial patches.
- Cotton, denim, and canvas are best suited for iron-on patches because natural fibers allow adhesive to penetrate, providing a more reliable bond during heating.
- For frequently washed items, applying the patch with heat first followed by edge stitching significantly extends the patch’s longevity and resistance to lifting.
- Synthetic, delicate, or coated fabrics like nylon, silk, leather, and spandex should be sewn or glued instead of using heat-based methods to avoid melting or damage.
- Using stabilizers and proper border finishes, like merrowed edges, helps patches stay flat and durable through repeated washing and wear.
Table of Contents
- What are the best materials for patches, and how do you pick one?
- Best fabrics for iron-on patches, and how to apply them right
- Fabrics to avoid for iron-on patches
- Stabilizers, backings, and border finishes that keep patches flat
- Sew-on vs. iron-on vs. hybrid: what actually lasts
- What LootsByShiry looks for in patch-friendly materials
- Want the patch already applied? Here’s the shortcut.
- Sources
- FAQ
What are the best materials for patches, and how do you pick one?
Choosing a patch material comes down to three questions: how the patch will be attached, how much detail it needs to hold, and how much abuse the finished item will take. Get those answers right and the rest of the decision practically makes itself.
Twill is the backbone of the patch industry, and for good reason. Its tight, diagonal weave gives embroidery machines a stable surface that resists stretching, which is exactly what high stitch density needs to look sharp instead of puckered. That stability is why twill is the industry standard for the vast majority of commercial embroidered patches sold today. If you’re ordering custom patches for a team, club, or event, twill is the safe default.
Felt is the softer, cheaper alternative, and it earns its place in craft projects, kids’ activities, and low-detail designs. It doesn’t hold fine stitching as cleanly as twill, but for a varsity-style letter patch or a simple shape, it works fine and costs less.
Chenille brings texture, that fuzzy, retro pile you see on old letterman jackets. The loft that gives chenille its look also means it needs sewing, not ironing, since the raised surface never makes full contact with adhesive. It also demands a larger needle and slower stitching speed to manage the pile’s weight.
For anything destined for a bag, jacket, or outdoor gear, canvas or heavy cotton takes the abuse better than lighter fabrics, while polyester blends add durability but need lower heat during application. PVC and leather patches sit outside this whole conversation. They typically arrive with their own backing, and Velcro or sewing is usually the safer attachment method.
- Twill: best for detailed, high-density embroidery and commercial-grade patches
- Felt: budget-friendly, simple shapes, craft and kids’ projects
- Chenille: tactile, vintage look, sew-on only
- Canvas or heavy cotton: bags, outdoor goods, high-wear items
- Polyester blends: durable but heat-sensitive during pressing
- PVC or leather: specialty look, usually needs Velcro or stitching
Best fabrics for iron-on patches, and how to apply them right
Cotton, denim, and canvas take iron-on adhesive better than almost anything else, and the reason is basic fibre science. Natural fibres have an open, porous structure that lets melted adhesive actually penetrate the weave rather than just sitting on top of it. These fabrics also tolerate the higher heat that hot-melt adhesives need to activate fully, which is why cotton, denim, and heavy canvas give the most reliable iron-on bonding.
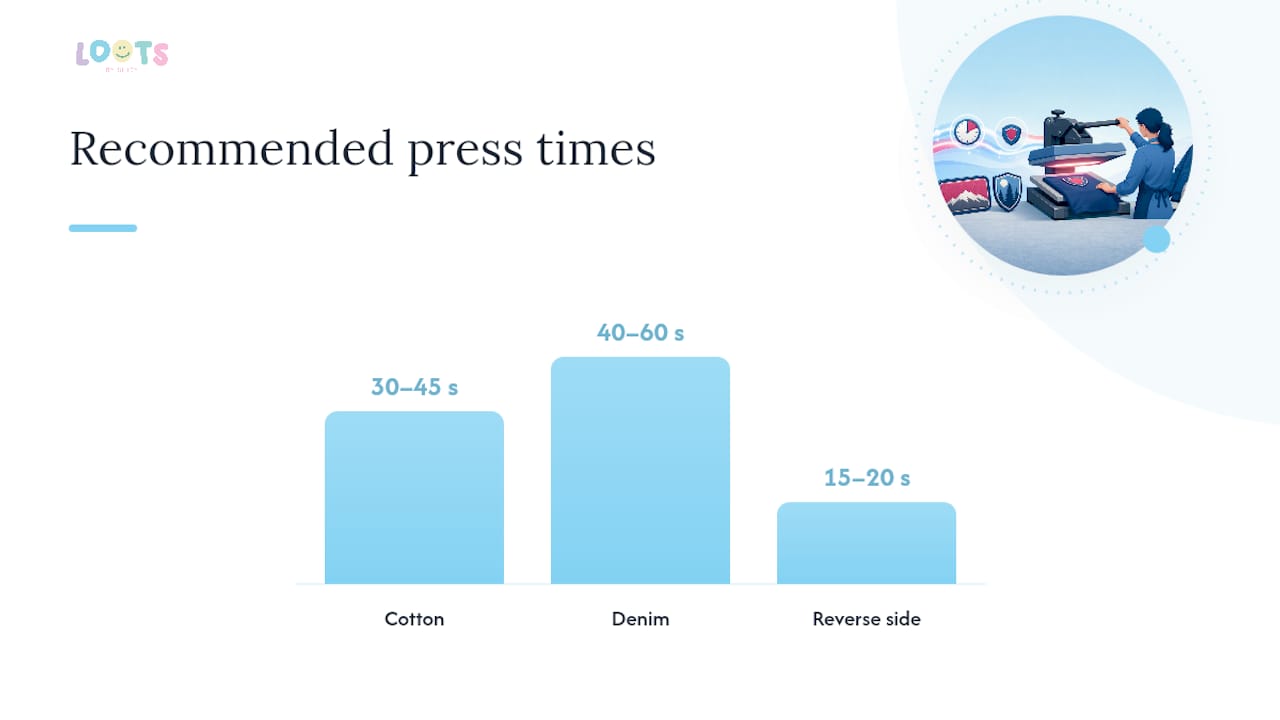
The temperature and press-time math matters more than most people think. Cotton generally needs 160 to 180°C for 30 to 45 seconds, while denim’s tighter weave calls for slightly higher heat, around 170 to 180°C, for 40 to 60 seconds. Skip the steam function entirely. Steam adds moisture, which interferes with adhesive bonding instead of helping it.
Here’s the actual technique that gets a patch to stay put:
- Preheat the garment area for a few seconds to remove ambient moisture and wrinkles.
- Position the patch and cover it with a pressing cloth or parchment paper. Never let the iron touch the patch surface directly.
- Press down with firm, even pressure and hold for the full recommended time. Don’t glide the iron around.
- Let the patch cool completely before checking the bond.
- Flip the garment inside out and press the reverse side for another 15 to 20 seconds to drive the adhesive deeper into the fabric.
Pro Tip: When patching a bag, tote, or anything with two fabric layers, slide a flat board or piece of cardboard inside first. It stops the iron’s pressure from getting absorbed by empty space, so you get full, even contact.
A home iron works fine for single patches, but a heat press earns its cost fast if you’re doing volume, since it holds consistent temperature and pressure across the entire patch at once. Whichever tool you use, test on a hidden seam or a fabric scrap before committing to the actual garment.
Fabrics to avoid for iron-on patches
Some fabrics just won’t hold a patch no matter how careful the technique is, and pushing heat onto them risks scorching or melting the garment itself. Nylon, silk, leather, spandex, and most waterproof or laminated fabrics either have a melting point too low for adhesive activation or a surface too slick for the glue to grip.
- Nylon: melts or warps before the adhesive properly activates
- Silk: scorches at iron-on temperatures and can’t take pressure
- Leather: the surface is too dense for adhesive penetration
- Spandex and elastane: stretch defeats any adhesive bond, and heat can degrade the fibre
- Waterproof or coated fabrics: the coating blocks adhesive contact entirely
For all of these, sew-on is the reliable fix. A specialist fabric glue or a proper leather adhesive can work in a pinch for non-washable items, and Velcro backing is worth considering for anything you’ll want to swap out later. When you’re not sure what a blend actually is, test a low, conservative heat setting on an inside seam first rather than guessing.
Stabilizers, backings, and border finishes that keep patches flat
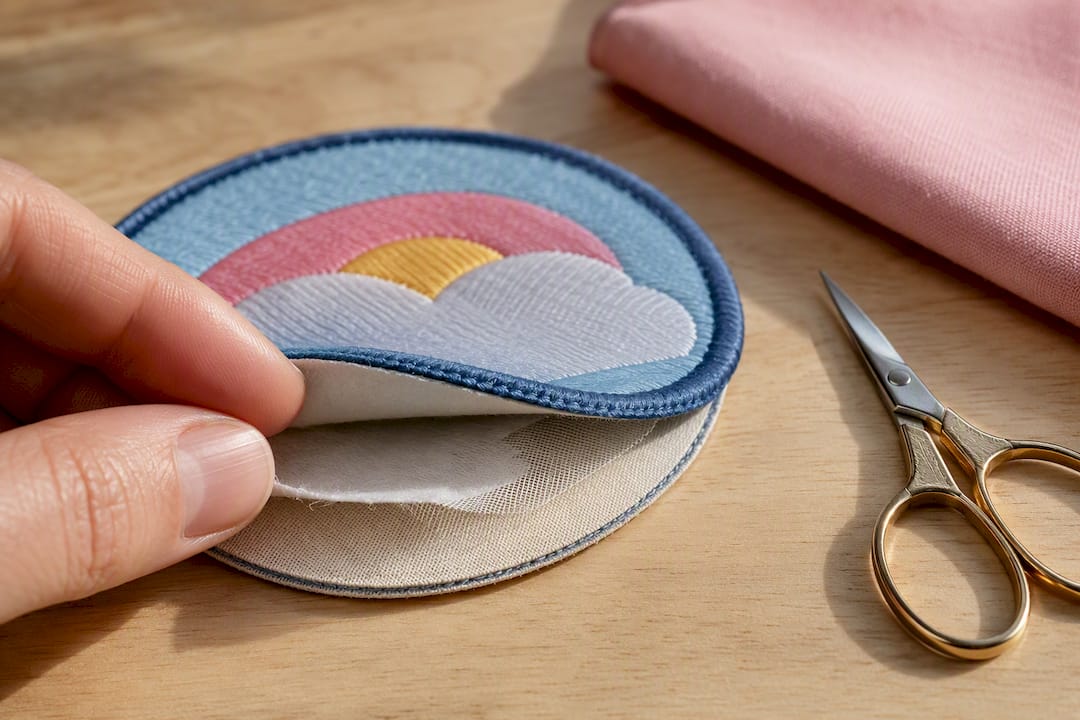
A patch made without stabilizer will pucker, curl, or warp the moment it comes off the embroidery frame. Cut-away stabilizer is the professional standard for standalone patches because it stays permanently in place behind the stitching, unlike tear-away stabilizer, which pulls free and leaves the design without structural support over time.
Backing choice depends on how the finished patch will be used:
- Hot-melt iron-on adhesive: simplest option for garments that just need heat to attach
- TPU adhesive backing: more flexible, good for stretch fabrics and streetwear
- PES (polyester) adhesive backing: more heat-resistant and rigid, better suited to workwear and structured garments
- Velcro backing: best for patches meant to be removed or swapped
- No-show mesh fusible: lightweight option for thin fabrics that can’t take a heavier backing
Border finishing matters too. A merrowed edge, the classic rolled border you see on most commercial patches, comes from a dedicated merrow machine and holds up better against fraying over years of wear. A satin-stitch border looks cleaner on smaller or more delicate designs but wears faster under repeated washing.
Pro Tip: The denser the embroidery, the heavier the stabilizer needs to be. A patch with heavy thread coverage on a light stabilizer will bow or curl within a few washes, no matter how good the stitching looks fresh off the machine.
Sew-on vs. iron-on vs. hybrid: what actually lasts
Sew-on patches outlast everything else, full stop. Hybrid application, iron it on, then stitch the perimeter, comes in second and is genuinely the best middle ground for anything that gets worn often. Iron-on alone is the most convenient option, but convenience comes at the cost of longevity.
Edge-stitching an iron-on patch converts it into a near-permanent attachment without losing the speed of the initial heat application. It’s a five-minute step that saves you from re-ironing a lifted corner three months later.
Caring for a patched garment properly extends all of this:
- Wash in cold water on a gentle cycle
- Skip the high-heat dryer setting, air dry or use low heat instead
- Turn the garment inside out before washing to reduce edge friction
- Edge-stitch iron-on patches early, don’t wait for a corner to lift first
A plain iron-on patch, with no reinforcement, commonly starts weakening after a few dozen wash cycles, especially at the corners where friction concentrates. Once you see even slight lifting at an edge, get a few stitches in before it becomes a full repair job. Waiting almost always means the patch comes off mid-wash and gets lost in the machine.
What LootsByShiry looks for in patch-friendly materials
When building custom loot bags and pouches, cotton and twill are common choices. They take a patch cleanly, hold their shape after repeated handling at parties, and photograph well for personalized touches usually wanted on display. Not every item accepts iron-on the same way; some smaller or lined pieces need sew-on for a lasting hold. For custom orders with specific patch requests, providing details can help match the attachment method to the piece.
— Shiry
Want the patch already applied? Here’s the shortcut.
Making your own patches is satisfying, but if you’d rather skip the ironing board entirely, LootsByShiry builds that option right into ordering. Our cotton tote bags and pastel pouches are made from exactly the fabrics this guide recommends for reliable patch attachment, and you can request custom patch placement, names, and colour choices directly at checkout instead of testing adhesive temperatures on a kitchen table.

This approach reduces trial-and-error with heat settings, avoids risk of scorching, and addresses stabilizer suitability to help ensure the patch stays put through occasions such as birthday parties and corporate events. Browse the full shop or head straight to the loot bags page to start building your personalized order today.
Sources
For deeper technical detail on the claims above, these guides are worth bookmarking: HTV RONT’s iron-on application guide, the Embroideres forum breakdown of patch materials, Rush Patch’s fabric adhesion guide, Marathon Threads’ stabilizer collection, and Apex Patches’ longevity comparison. For embroidery texture choices on headwear, see Plaid Gorilla Golf’s puff vs. flat embroidery guide.
- How to iron on patches — HTV RONT (Canada)
- Materials for Making Patches: What Determines Quality — Embroideres forum
- Best fabrics for iron-on patch adhesion — Rush Patch
- Stabilizer collection — Marathon Threads (Canada)
FAQ
What’s better, iron-on or sew-on patches?
Sew-on lasts longer because stitching physically anchors the patch through the fabric rather than relying on adhesive alone. Iron-on is faster and fine for low-wear items, but for anything washed often, a hybrid approach of ironing first and stitching the edges gets you both convenience and durability.
What is the best fabric to put patches on?
Cotton, twill, denim, and canvas all accept patches reliably, whether you’re sewing or ironing. Twill is specifically preferred for embroidered patches because its dense weave supports high-detail stitching without distorting.
What material do patches stick to best?
Patches with hot-melt adhesive stick best to natural fibres like cotton, denim, and heavy canvas because their open weave lets adhesive penetrate rather than sit on the surface. That’s the same reason these fabrics tolerate higher activation heat than synthetics.
What fabric can you not use iron-on patches on?
Avoid ironing patches onto nylon, silk, leather, spandex, and waterproof or coated fabrics. These materials either melt, scorch, or resist adhesive bonding, so sewing or Velcro is the safer route.
Can LootsByShiry add patches to custom loot bag orders?
Yes, LootsByShiry offers cotton tote bags and pastel pouches that accept patches well, with custom placement available when you place your order through the shop. Pricing for these items is listed on the site at checkout.